School projects often feel like a mix of excitement and stress. You want your work to stand out, but sometimes your presentations can sound flat or too ordinary. That’s where adding a creative twist can make all the difference. One of the easiest ways students can make their projects more fun, memorable, and engaging is by using the CapCut Voice Changer. This tool allows you to transform your voice into different styles—robotic, deep, chipmunk-like, or even dramatic. By doing so, your school projects can instantly transition from plain to engaging without requiring expensive equipment or advanced editing skills.

Why Add Voice Effects to School Projects?
Before diving into the steps, let’s talk about why you should consider using CapCut’s Voice Changer for schoolwork.
-
Boosts Engagement – A history project narrated in a deep “documentary-style” voice, or a science project explained with a robotic effect, can grab attention instantly. Your audience (teachers and classmates) will be more likely to stay interested.
-
Makes Learning Fun – Presentations don’t have to be boring. Adding humor or character voices can make both the project and the learning experience enjoyable for everyone.
-
Saves Time and Effort – Instead of searching for someone with a specific voice or buying extra tools, you can record your own voice and transform it directly into CapCut.
-
Encourages Creativity – School projects are about more than just information; they’re also about presentation. Experimenting with different voice effects helps students think creatively and express themselves effectively.
Examples of Projects That Benefit from Voice Changer
Here are a few ways students can creatively use CapCut’s Voice Changer feature:
-
History Presentations: Narrate a scene as a medieval king or a robotic time traveler.
-
Science Projects: Utilize a robotic effect to illustrate concepts such as planets, atoms, or technology.
-
Literature or Drama Assignments: Give characters unique voices in a storytelling project.
-
Group Videos: Assign different voice effects to team members for a more dynamic and entertaining presentation.
-
Language Projects: Add humor by exaggerating tone and pitch for skits or dialogues.
By tailoring the effect to the subject, you can turn even the most serious project into something unforgettable.
How to Enhance School Projects with CapCut Voice Changer
Now, let’s break down how you can start using CapCut Video Editing Software and its Voice Changer right away.
Step 1: Record or Import Your Audio/Video
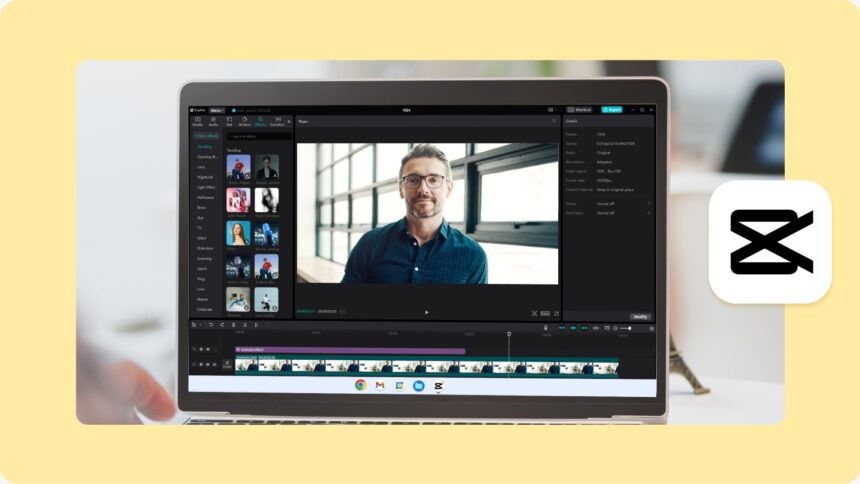
Open CapCut Desktop Video Editor on your computer. Start a new project and upload your school video or voice recording. If you haven’t recorded audio yet, you can do it directly in CapCut using the built-in recording tool. Record your voice in a quiet space for clearer results before applying effects.

Step 2: Apply the Voice Changer Feature
Once your audio is on the timeline, select it. Go to the Voice Changer option in the toolbar. You’ll see a variety of effects like robotic, deep voice, chipmunk, echo, and more. Click through the effects and preview them to see which one matches your project’s theme. If you’re presenting a space project, the robotic voice might sound futuristic and cool. For a storytelling project, consider using a chipmunk or a deep voice to distinguish between different characters. Try CapCut Online Photo Editor to edit your school project photos.

Step 3: Fine-Tune and Export
After selecting the effect, adjust the volume and timing to ensure your project sounds clear. Sync the altered audio with visuals, slides, or animations. Once you are satisfied, click Export to save your project as a video file. Your final project will now have professional editing and fun voice effects—all in one! Always do a quick playback to ensure your voice effect enhances the project without making it hard to understand.

Tips for Making the Most Out of Voice Effects
-
Don’t Overdo It – While effects are fun, clarity is key for school projects. Use them strategically, not on every line.
-
Match the Theme – Choose effects that enhance your subject. For example, avoid a chipmunk voice when discussing serious topics, such as historical wars, unless you’re aiming for humor.
-
Practice First – Record a short test clip, apply different effects, and see which works best before editing the entire project.
-
Combine with Visuals – Pair your altered voice with animations, captions, or graphics to create a more polished presentation.
Why Choose CapCut Desktop?
CapCut is more than just a voice changer. It’s a free, AI-powered video editing tool designed to make creative projects accessible. Here’s why students love it:
-
User-Friendly Interface – Easy to navigate, even for beginners.
-
Free to Use – Unlike many editors, CapCut offers advanced tools without hidden costs.
-
Multi-Feature Platform – You can trim clips, add transitions, text, background music, and more—all in one place.
-
AI Enhancements – From text-to-speech to automatic captions, the AI features make editing smoother and faster.
-
Cross-Project Use – Whether it’s for school assignments, YouTube, or personal videos, CapCut adapts to multiple needs.
With everything in one editor, students can polish their projects to look and sound professional while still having fun.
Conclusion
Enhancing school projects isn’t just about adding information—it’s about how you present it. CapCut’s Voice Changer feature enables students to add personality, humor, and creativity to their work. Whether you’re narrating a history lesson, presenting a science experiment, or creating a group skit, the right voice effect can make your project unforgettable.
With just three simple steps—record or import audio, apply the voice changer, and fine-tune before exporting—you can elevate any school project without stress. So next time you’re preparing for class, don’t just settle for plain narration. Open CapCut, try out the Voice Changer, and watch your project come alive with voices that entertain, engage, and impress.